Showing posts with label Tutorial. Show all posts

Wednesday, 2 February 2011

Fabric Flower Head Band Tutorial


Since starting my blog I have bookmarked a ridiculous number of websites for recipes, crafts, tutorials and ideas.  Some of my favourite ideas are for flower accessories I posted some of the designs I like the best last year.  When my mum handed me a voile scarf she was given for Christmas and said would never use I had the perfect idea for a quick craft and completed it in an hour.  I liked it so much I had to wear it to work today and my friends all really liked it. 


So here is my very quick tutorial so you can all make your own...


1: Start by gathering everything you need:
Fabric 
(I have seen this done with Voile or Satin but you can experiment)
Scissors
Candle & Lighter
Needle & Thread
Beads
Head Band


2: Cut out rough circles in different sizes from the fabric.  You can do this by eye for a a more rugged look or use a template. The petals will shrink a bit so take this into consideration and don't make the circles too small.


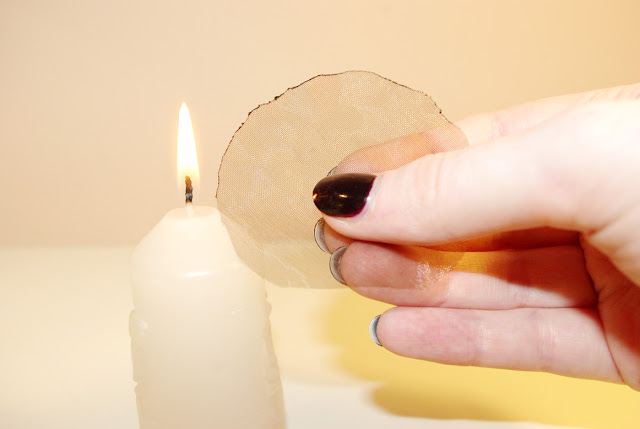
3: Light the candle and very carefully hold the fabric near the flame so it just melts the very edge.  This will stop it fraying and curl the edges up to make the petal.


Be very careful with this step otherwise you may set the fabric alight and end up with a big hole, I have wasted quite a few pieces this way!!


4: Once you have sealed all of the edges of the fabric sew the pieces tightly together through the middle.


5: Add a button or beads to the centre of the flower, this will bunch the fabric a little.


6: Sew the flower on to a head band.  I have attached this flower to a large elastic head band, but you could use a hair band, ribbon or a hair clip.


If you want to link to this tutorial or try it yourself don't forget to comment and let me know how you get on!!

Saturday, 18 December 2010

Sparkly Sequin Earrings Tutorial


I love making earrings and as I have read so many different tutorials to get my inspiration, I thought it only fair to share one of my designs.  I recently blogged about some sparkly sequin earrings that I am making for Christmas, so here's how it's done...

1: Start by gathering everything you need:
0.8mm Wire
Round Nosed Pliers
Flat or Chain Nosed Pliers
Clippers
Sequins
Beads
Optional
0.4mm Wire
Earring Hooks
Jump Rings

You can make the jump rings and earring hooks yourself but I choose to buy them as I am making quite a few.


2: Lay out the design with the jump rings and beads.  I am making a downward pointing triangle so each dangle increases by 1 jump ring up to 5 then back to 1.


3: Using the cutters cut the 0.8mm wire to about 10cm; it can be longer or shorter depending on how low you want the earrings to hang.  Shape the wire into a horseshoe and make a loop in one end using the round nosed pliers.


4: Because the jump rings I am using are larger than the beads, I made mini jump rings using the 0.4mm wire and the round nosed pliers, so the beads would stay in place.  If using smaller jump rings or larger beads this step can be missed out.


5: Using 2 sets of pliers prise open the jump rings, thread on a sequin or two and the mini jump ring to complete the first dangle.


6: Start again on the next dangle this time using 2 jump rings and a mini, keep going until all the dangles are complete.


7: Thread a bead onto the wire, then the dangle, then another bead.


8: Continue in this pattern until you have threaded all the dangles and beads onto the wire.


9: Using the round nosed pliers, make a loop at the other end of the wire at 90 degrees to the first.  Open this loop and thread it onto the wire underneath the first.


10: Attach an earring hook to the first loop and voilĂ  a masterpiece!!


These are for a special friend of mine, I really hope she likes them.  If you want to link to this tutorial or try it yourself don't forget to comment and let me know how you get on!!