Showing posts with label Geekery. Show all posts

Tuesday, 28 February 2012

The Cheesecake Factory

Now I love cosplay, I really admire the people who go all out and dress up as their favourite characters from television, books, games and film.  My friend Sarah Jane and I have intended for last couple of years to dress up for the MCM Expo in London but either I don't have the nerve or we run out of time to come up with anything.  We did make awesome Lego Star Wars t-shirts last year but this year we decided to go one step further and actually dress up.  Now we haven't gone crazy but I'm really excited about our idea as I have been wanting to do it for a while.  We are going as cheesecake factory waitress' from The Big Bang Theory.


We are currently preparing everything we need to get; it is surprisingly hard to find a mustard V-neck sweater vest so if any of you see one on your travels please let us know.  We also have a little extra surprise along with the basic costume, which I am so excited about and have already started making so watch this space.

Do you think we can convince the boys to dress as Howard, Leonard and Sheldon??

Tuesday, 14 February 2012

Practical Valentine

This is what I got Graeme for Valentine's Day, yes you are correct that is a saucepan stuffed with marshmallows, pink&whites and pink wafers yum!! I thought I should be practical this year as our budget is quite tight and last week the handle fell off our current sauce pan so this was an excellent excuse to get a new one.  The sweet treats were pink, for Valentine's, and also fat free so slightly healthier than a box of chocolates!!


A friend shared these awesome Skyrim valentine's cards from Jemma Salume at Oxboxer which are just  fantastic.  I understand they make no sense if you don't play Skyrim but they are pretty funny if you do and I know Graeme will love it so that is what is important.  This is the one I chose for Graeme:


Here are some other greats!!

Sunday, 12 June 2011

Magic Magnets


I recently got hold of some sheets of magnet and just knew I had to do something with them.  I recently made up a bit of care package for Graeme to see him through his exam revision and decided I could include some fun magnets too.  I picked one of Graeme's favourite hobbies, a card game called Magic, which is made up of 5 different groups of cards, White, Red, Blue, Green, Black.  I had a quick browse around the internet for some decent images but couldn't find anything I liked or were large enough.  I ended up taking a tiny image of the badges from the magic website and redesigned them in Photoshop with better backgrounds so I could print them off much larger.


Before we go any further, Yes, I have attempted to play this game and No, I didn't get on with it.  Mainly because I lost and couldn't really see the point of playing again.  Graeme is determined to teach me so I will have another go but only if he promises to go easy on me and give me a really good deck of cards.

One thing I didn't think about when designing was how to cut the magnets into a perfect circle.  I did try using one of Dad's drills but this gave a very rough edge and I knew I could do better with scissors.  Note to self: Next time design square magnets!! After cutting (which seemed to take forever) and sticking the paper designs on, the magnets just didn't feel finished, so I went online to look for a glaze I could cover them in.  The best one around seems to be Aleene's Paper Glaze, which gives a raised and glossy finish.  This I could only order online though and I didn't have the time or money, so instead I set about trying to make my own glaze.

Attempt 1: First thing to try of course, was clear nail varnish.  This gave a really nice glossy finish but soaked into the paper and made it all blotchy. FAIL

Attempt 2: Good old PVA glue.  This goes on white but dries clear so worked really well, although a thin layer didn't make any difference at all, so I ended up putting on a really thick layer to see if it would be raised. This didn't work, the glue dried in clumps and the edges of the paper went all wavy, but at least it didn't soak into the paper. FAIL


Attempt 3: Learning from mistakes I used a mixture of my two previous attempts.  Firstly a thin layer of PVA glue to seal the paper.  Then when it was dry I went over with clear nail varnish for a glossy finish.  It worked perfectly and the result was exactly what I wanted and I didn't have to buy anything, very resourceful!!


Graeme loved them, he probably like the booster packs of Magic I got him more but I'm ok with that.  Now I just need to decide what to design next, something most definitely with straight edges!!

I also want to congratulate Graeme on finishing his final exams and final year of Uni, can't for you to get home!!

Wednesday, 16 March 2011

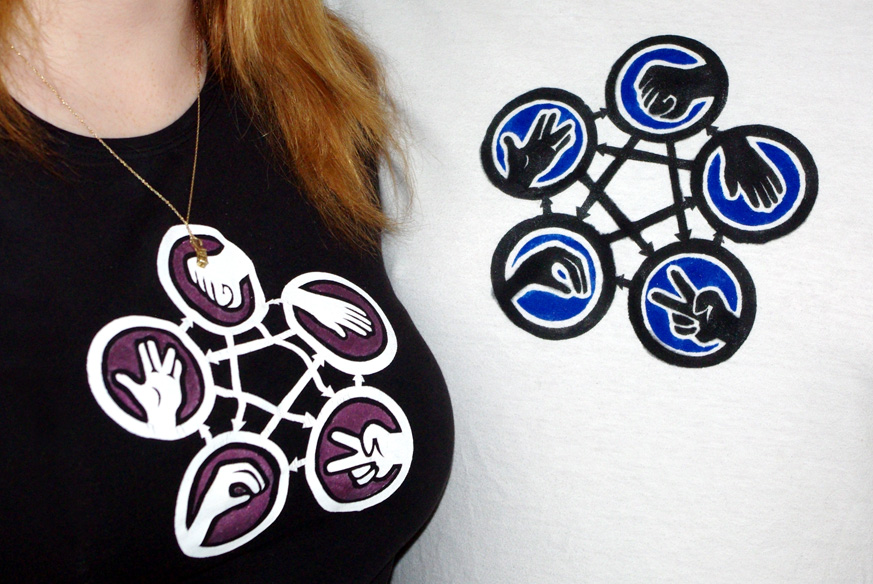
Rock, Paper, Scissors, Lizard, Spock


My most favourite TV show at the moment is The Big Bang Theory.  I'll admit it, I'm a geek and this show cracks me up so much.  One of the things I love best about the show is how geeky everything is from their clothes and apartment to their games and tech.  Geek Chic is very in and I plan to decorate my home in a similar fashion, I think between Graeme and I we already are already half way there!!  One of the best episodes in the 2nd series titled The Lizard-Spock Expansion involved Sheldon playing a game based on Rock, Paper, Scissors, but with two extra hand gestures, Lizard and Spock.  It makes the game so much more interesting especially if you play with more than two people.  The rules are as follows:


Scissors cut paper
Paper covers rock
Rock crushes lizard
Lizard poisons Spock
Spock smashes scissors
Scissors decapitates lizard
Lizard eats paper
Paper disproves Spock
Spock vaporizes rock
Rock crushes scissors


Just after this episode came out on TV (over a year ago) I desperately wanted this on a t-shirt, I found loads of different versions but the only one I really liked was from America, and at $15 for the t-shirt and twice as much for postage it really didn't seem worth it.  But I have a crafty nature and after my experiments with freezer paper I revisited my dream decided to make my very own!!

At the weekend I visited Graeme at Uni and whilst he was working on his masters project, I got down to business.  I drew the design out and started cutting, this took over two hours as the design was so complicated (I really really want a Silohette SD, but I'll talk more about that another time!!).  


I then had to very delicately iron it down as the paper was so thin in places. This looked pretty good on it's own maybe I should try and inverse of the print as well!!


I had decided to do white paint on a black t-shirt with the inside of the images grey (as these were the only two opaque paints I had) but after painting the white on I decided grey would be boring.  So we took a trip to Hobbycraft and I bought some opaque glittery purple paint, my perfect colour!!


Unfortunately by the time I had got back the paint had dried and because the paper was so thin it had lifted off of the t-shirt so I had to be extra careful painting on the purple.  After waiting an agonising 2 hours for the paint to dry (I had forgotten my hair dryer) the result was amazing!!  This is my new favourite t-shirt and is so completely awesome!!


We went out for a few drinks at Greame's student union and quite a few people commented on how awesome it was.  It made Graeme very jealous so I made him a t-shirt too.  Fortunately I was able to use the same paper pieces for his, although it did take ages to get them unwrinkled and in the correct places.  I also noticed that the black and blue ink was a lot thinner than the opaque so the edges bled a bit, although this didn't notice too much.  I have a feeling a few more of my friends will want this t-shirt too...


My next plans for the freezer paper are some cushions covers which I'm going to make with my friend Gemma to match the wallpaper in her new home, I can't wait!!


UPDATE:
I included the bloopers because they are hilarious! Rock Paper Scissors Lizard Spock starts at 6:10


Tuesday, 15 February 2011

Valentine's Weekend Continued...

What a weekend, it was absolutely awesome!! Of course the biggest treat was seeing Graeme as it has been quite a few weeks since I saw him last; when he returned to Uni I had stinking tonsillitis so didn't say goodbye properly.  But this weekend I was treated royally, where to start...

So firstly I saw The Haunting at Windsor Theatre with my parents.  After reading the program properly I realised it wasn't actually written by Charles Dickens just based on many of his short stories and parts of his life.  Even so it was very good; there were only 3 actors in the whole play which I thought would get very monotonous but not at all. The special effects were really good, there were books flying from the walls, ghosts appearing out of no where, the woman in front of me was jumping so much it made me giggle.  It may not be to everyones taste but I enjoyed it quite a bit, and would definitely go and see another like it.

I then drove up to see Graeme, which was good in a way because there was no traffic at 10.30 on a Friday, but I decided to go up on the M1 and forgot they are doing roadworks, so was stuck at 50mph for most of the journey, ahhhhh!!!  I came back on the M40 much quicker!!  When I did arrive I was greeted by a lovely bunch of flowers in a very pretty white vase (as Graeme didn't have a vase in the house, well they are all boys I suppose).  


He couldn't wait to open his presents and as it was a Valentine's weekend (because I was going home on Monday) I let him open them straight away.


I drew him a Lego Star Wars picture of Darth Vader and some Storm Troopers from a tutorial I found, I also cunningly added some hearts because it is Valentine's after all.  The hearts and words are painted with acrylic paint, the rest I coloured in with alcohol markers; I used acetone to smudge the colours together which was very effective.  I have only tried this method once before but it worked really well, so I may have to make some more artwork using this method, I will also need to purchase some more pens as I only have 3 shades of grey.  I also need a thinner black marker pen for the edges, I kept smudging the felt tip I used accidently.


I also bought him some Star Wars Lego to start building his very own chess set I posted about last year, and a little Lego truck set because I couldn't resist and went a bit mad for Lego!!


Graeme bought us tickets for The Blanks who were so awesome!! They were really fun and it was great to hear live all the songs they sing in Scrubs.  They even sung the song I posted about last week, so amazning!!  Our last Valentine's treat was to see Tangled 3D at the cinema, which I loved!! I think it really will become a Disney classic it was a good story and really funny in parts, with a bit of innuendo thrown in for the adults.  I would definitely recommend it to any Disneyholic like me!!


My favorite character is Pascal the Chameleon, he is a very cheeky chappy!!


Greame's was Maximus the Horse, who was part dog and completely awesome at sword fighting!! Also love the fact the tavern is called The Snuggly Duckling!!!


So that concludes my weekend now back to reality for a bit!! I have a few new craft projects lined up and a few old ones that I still haven't completed.  Watch this space I'll post very soon...

Sunday, 9 January 2011

Risky Crafting

I do apologise that I have not shown any new crafts over the past couple of weeks. One thing I have realised is that when Graeme is home I just don't seem to have any time to myself, I'm not complaining but I do feel a tad unproductive.  My other excuse is that my photo studio (the end of my desk, with a couple of desk lamps) has been taken over by an epic game of Risk; which we still haven't finished! We are level pegging at the moment, I'm yellow, Graeme is blue and the National Army is brown, it's a tense battle I'm currently trying to conquer Asia and North America, but Graeme is standing his ground in Europe!!


Anyway I thought I should show you some recycled earrings I made before I started my blog in the post below.